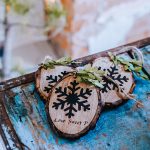
How To Make DIY Wood Slice Ornaments (Two Ways)
Wood slice ornaments add a touch of rustic Scandinavian charm to your Christmas decorations! Try these two easy ways to create wood slice ornaments, perfect for giving as unique gifts or hanging on your Christmas tree during the holiday season.
Yield: 1 pieces
Cost: 5
Equipment
- 1 Drill with a small bit
- 1 Cricut or Cameo machine
- 1 Weeding tools
- 1 Scissors
Materials
- 1 Wood slices
- 1 Vinyl sheets
- 1 Transfer tape
- 1 Acrylic paint and brushes (optional)
- 1 Twine or ribbon
- 1 Clear sealant spray or polyurethane (optional)
Instructions
- Prepare your design in the Cricut Design Space software. You can choose from a wide range of pre-designed templates or create your own custom design.
- Once your design is ready, load the vinyl into the Cricut cutting machine and follow the instructions to cut out your design
- After the design has been cut, use the weeding tool to remove the excess vinyl from around the design, leaving only the desired shape on the backing.
- Cut a piece of transfer tape slightly larger than your design and carefully place it over the vinyl, using a scraper tool to ensure it adheres well.
- Gently peel off the backing from the vinyl, leaving the design on the transfer tape.
- Position the transfer tape with the vinyl design onto the wood slice, making sure it is centered and aligned as desired.
- Use the scraper tool to firmly press the vinyl onto the wood slice, ensuring that it adheres properly.
- Slowly and carefully peel away the transfer tape, leaving the vinyl design securely attached to the wood slice.
- Allow the vinyl to fully adhere to the wood slice before adding any additional decorations or hanging the ornament.
- Enjoy your personalized ornaments or gift tag!
Video
Notes
Tips and Tricks for Making Wood Slice Ornaments
- Experiment with different types and sizes of wood to add variety to your ornaments. Different wood grains and colors can create an interesting assortment.
- If you plan to paint the wood rounds, lightly sand the surface before painting to help the paint adhere more effectively.
- Try different finishes, such as glossy, matte, or distressed, to achieve the desired look for your round wood ornaments.