This post may contain affiliate links. Please read our full Disclosure Policy.
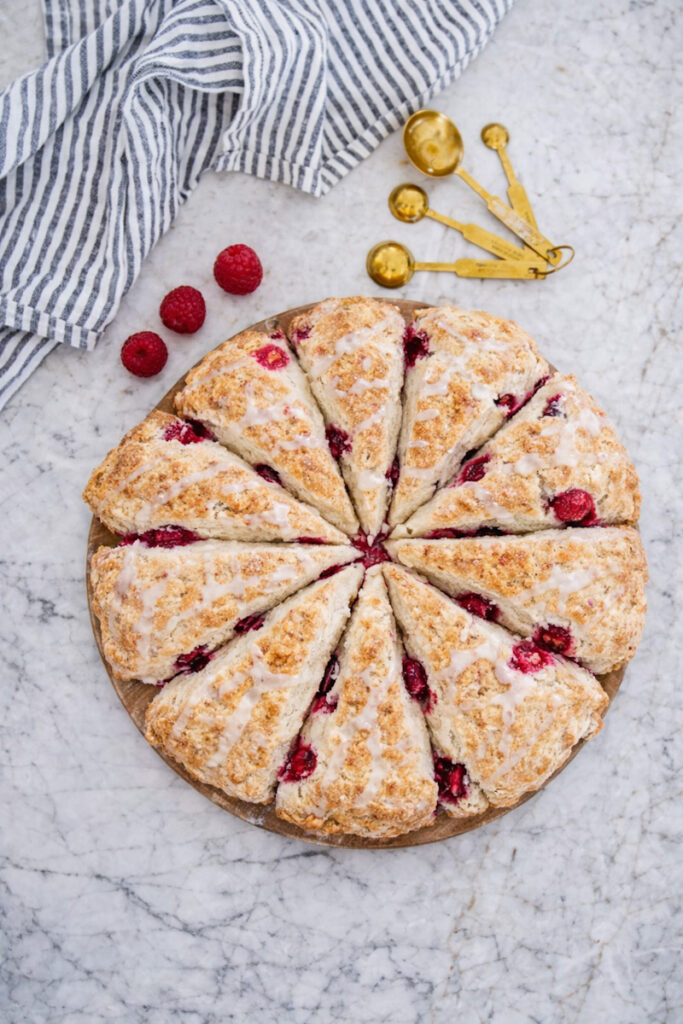
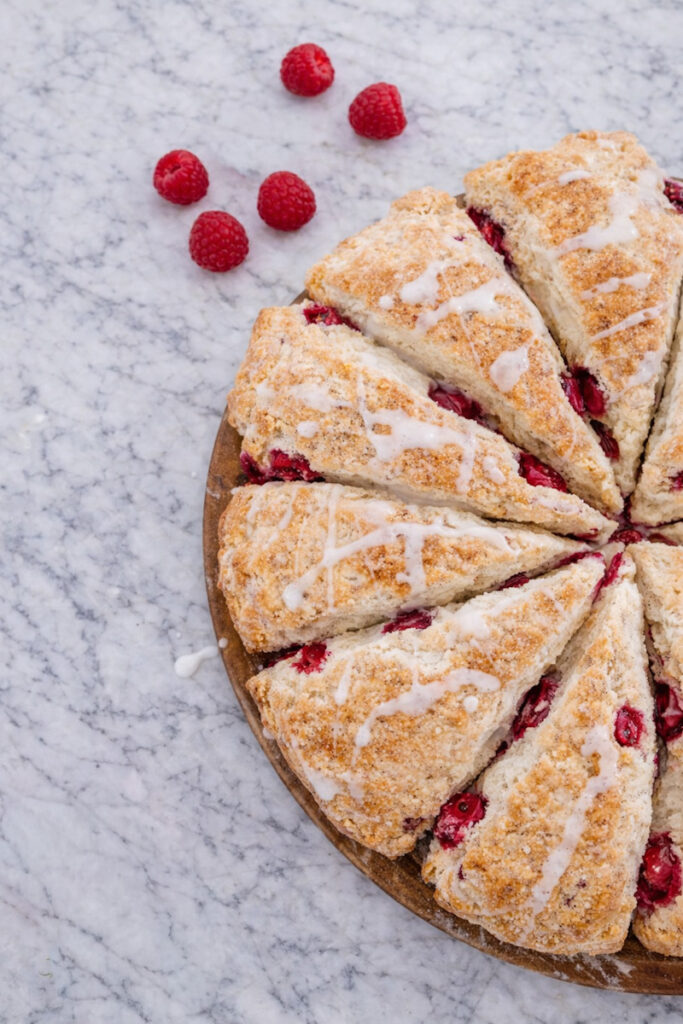
This white chocolate raspberry scone is everything a bakery-style scone should be, flaky on the outside, tender in the center, and perfectly balanced between sweet white chocolate and tart raspberries. If you’ve been searching for a reliable white chocolate raspberry scone recipe that rises beautifully and tastes indulgent without being heavy, this is it.
Growing up on the farm, my mother made scones almost every weekend. It was one of her favorite things to bake for the family! She was always trying different types of scone flavors, from savory to sweet, and there was something new every weekend! There were a few that truly stood out more than others, and this white chocolate raspberry scone recipe was one of them!
These raspberry or my amazing blueberry scones are perfect for breakfast or brunch, but they could even be a dessert if you add a bit of sweet strawberry jam!
If you love this white chocolate raspberry scone, you’ll definitely want to try a few more cozy favorites from the blog. My bright and tender Lemon Poppy Seed Loaf is perfect for spring mornings, and the incredibly moist Chocolate Chip Zucchini Bread (No Butter) is one of those recipes you’ll make on repeat. For an easy classic, my soft and simple No Butter Banana Bread with Oil never disappoints, and when fall rolls around, these warm, gooey Pumpkin Chocolate Chip Cookies are always the first thing to disappear from the cooling rack.
Before You Begin
Before you melt the chocolate, there arBefore you start mixing your white chocolate raspberry scone dough, take two minutes to read this section. These small details are what separate flat, heavy scones from tall, flaky, bakery-style ones.
Scones may sound fancy, but they are actually one of the simplest baked goods you can master. The key to a truly beautiful white chocolate raspberry scone comes down to a few non-negotiables.
1. Start with Cold Ingredients
This is the most important rule.
- Cold butter
- Cold eggs
- Cold cream or milk
Just like a pie crust, a white chocolate raspberry scones become flaky when the butter melts in the oven, not in the bowl. If your butter softens too soon, your scones will spread instead of rise, and the texture will turn dense rather than tender.
If your kitchen is warm, don’t hesitate to pop your cubed butter back into the fridge for a few minutes before mixing.
2. Leave Visible Butter Pieces
When mixing your white chocolate raspberry scone dough, you should still see pea-sized pieces of butter. Those little pockets are what create flaky layers as they melt during baking.
It may feel wrong to leave lumps, but trust the process. Those lumps equal lift.
3. Handle the Dough Gently
The more you mix and knead, the tougher your white chocolate raspberry scone will become. Overworking the dough develops gluten, which is great for bread, but not for tender scones.
I always tell my kids, “The less touching, the better.” It applies perfectly here.
Mix just until combined. Stop while you’re ahead.
A Quick Note About Fruit Scones
Adding fruit can make scones a little trickier. Raspberries release moisture, and too much moisture can cause your white chocolate raspberry scone to fall flat.
Here’s how to prevent that:
- Use frozen raspberries instead of fresh
- Avoid smashing the berries as you mix
- Lightly flour the surface of the dough
- Do not overwork the mixture
- Place the scones close together on the baking sheet
When your white chocolate raspberry scone bakes touching its neighbor, it rises upward instead of outward. The result is taller, fluffier, beautifully shaped scones.
Follow these simple steps, and you’ll set yourself up for success before the oven is even preheated.
Ingredients for Raspberry Scones
This white chocolate raspberry scone uses simple ingredients, but each one plays an important role in texture and flavor.
All-Purpose Flour – Provides structure while keeping the crumb tender. Spoon and level for best results.
Granulated Sugar – Adds sweetness and helps create a lightly crisp, golden top.
Baking Powder – Essential for a tall, fluffy white chocolate raspberry scone. Make sure it’s fresh.
Salt – Balances the sweetness and enhances both the raspberries and white chocolate.
Very Cold Butter – The key to flakiness. Cold butter creates steam pockets in the oven, forming tender layers.

Fresh Lemon Juice – Brightens the raspberries without making the scone taste lemony.
Vanilla Extract – Adds warmth and depth to the overall flavor.
Whole Milk or Heavy Cream – Brings moisture and richness. Cream makes a slightly richer scone.
White Chocolate Chunks – Melt into creamy pockets throughout the scone. Use good-quality chocolate for best flavor.
Frozen Raspberries – Best for structure. They hold their shape and prevent excess moisture in your white chocolate raspberry
Egg Wash – For that bakery-style golden finish
Step-by-Step: How to Make White Chocolate Raspberry Scones
Follow these simple steps for the perfect white chocolate raspberry scone every time.
Step 1: Cut in the Butter
In a large bowl, cut the cold butter into the flour mixture using two knives or a pastry cutter until it resembles coarse crumbs.
Step 2: Mix the Dry Ingredients
In a separate bowl, combine flour, sugar, baking powder, and salt.
Step 3: Combine Butter and Dry Mixture
Add the butter and mix until crumbly. Remember: visible butter pieces are good.
Step 4: Add White Chocolate
Transfer to a large bowl and gently fold in the white chocolate chunks.
Step 5: Mix Wet Ingredients
In a separate bowl, combine lemon juice, vanilla extract, and milk.


Step 6: Form the Dough
Pour the wet ingredients over the dry mixture. Gently toss until a dough forms. Do not knead.
Step 7: Add Frozen Raspberries
When the flour is almost incorporated, gently fold in the frozen raspberries.
Frozen berries are ideal for a white chocolate raspberry scone because they hold their shape and release less moisture.
Step 8: Shape
Roll the dough to about 1-inch thickness. Cut into rounds or triangles and place on a parchment-lined baking sheet.
Step 9: Egg Wash
Brush with one beaten egg mixed with 1 tablespoon water. If you prefer not to use egg wash, you can brush the tops with:
- Heavy cream (for a softer finish)
- Milk (lighter color, less shine)
- Nothing at all (still delicious, just less golden)
But if you’re going for that tall, flaky, bakery-case white chocolate raspberry scone look, the egg wash is your quiet little secret.
Step 10: Sugar Topping
Sprinkle with coarse sugar for that bakery finish.
Deb’s Tips for the Best White Chocolate Raspberry Scone
After years of baking, and watching my mom make scones even over an open fire and BBQ, these tips always make a difference:
- Chill the dough before baking
- Bake on the middle rack
- If dough feels sticky, add a tiny bit of flour
- Add lemon zest for extra brightness
- Refrigerate shaped scones overnight and bake fresh in the morning
This flexibility is one of the reasons I love this white chocolate raspberry scone recipe so much. It fits into real life.
Make-Ahead & Storage
Can You Freeze White Chocolate Raspberry Scones?
Yes! This white chocolate raspberry scone freezes beautifully.
- Store baked scones in an airtight container
- Freeze up to 3 months
- Reheat in the oven for best texture
You can also freeze unbaked scones and bake directly from frozen, just add a few extra minutes.
Your Questions
You can, but frozen raspberries work best for a white chocolate raspberry scone. Fresh berries release more moisture and can make the dough too wet. If using fresh, handle them very gently and consider adding a light dusting of flour before folding them in.
Pinched for time? Premake your scones the night before. Shape the dough into the rounds, then refrigerate until morning or when needed.
This usually happens if:
The butter wasn’t cold enough
The dough was overmixed
The raspberries were too soft or smashed
The scones were spaced too far apart
For a tall white chocolate raspberry scone, keep ingredients cold and place the cut triangles close together on the baking sheet so they rise upward instead of outward.
Yes. A simple powdered sugar glaze with a splash of milk or lemon juice pairs beautifully with white chocolate raspberry scones. Just drizzle lightly once they’ve cooled.
Pin for Later
want to save this recipe?
Enter your email & I’ll send it to your inbox. Plus, get great new recipes from me every week!
By submitting this form, you consent to receive emails from B Vintage Style.

Ingredients
- 3 cups all-purpose flour
- 1/2 cup sugar , granulated
- 6 tsp baking powder
- ½ tsp salt
- ¾ cup butter , cubed and very cold
- 1 cup white chocolate chunks
- 2 tbsp lemon juice fresh
- 2 tsp vanilla extract
- 1 whole milk or cream
- 1 1/2 cups frozen raspberries or fresh
For the Egg Wash
- 1 egg
- 1 tbsp water
Optional Topping
- sugar coarse
Instructions
- Preheat oven to 375°F (190°C) and line a baking sheet with parchment paper.
- In a large bowl, combine flour, sugar, baking powder, and salt.
- Cut in the very cold butter using a pastry cutter or two knives until the mixture resembles coarse crumbs with pea-sized pieces of butter remaining.
- Gently stir in the white chocolate chunks.
- In a separate bowl, whisk together lemon juice, vanilla extract, and milk or cream.
- Pour wet ingredients over the dry mixture and gently toss together until a shaggy dough begins to form. Do not overmix.
- When the flour is almost incorporated, gently fold in the frozen raspberries.
- Turn dough onto a lightly floured surface and gently pat into a 1-inch thick round.
- Cut into 8–10 triangles and place on prepared baking sheet, positioning them close together for better rise.
- Whisk egg and water together. Brush tops of scones with egg wash and sprinkle with coarse sugar if desired.
- Bake for 22–25 minutes, or until lightly golden brown.
- Cool slightly on a wire rack before serving.
Notes
- Don’t over-mix your dough! It is very important that pea-sized pieces of butter remain in your scone mixture. The less touching the better!
- Avoid using berries or fruit that will add more moisture to your dough! If your dough has too much moisture, simply add a small amount of flour.
- You could also add lemon zest for a pop of flavour as well!
- Chilling the dough before baking is key!
- Bake on the middle rack.
- Note that you can pre-make these scones the night before! Make them into the desired shapes and refrigerate until you are ready to bake them.