This post may contain affiliate links. Please read our full Disclosure Policy.
DIY Christmas Garland
Nothing makes the house smell better during the holiday season than Christmas Garland made from fresh greenery. Let’s dive into how to make a garland out of fresh greenery, along with some tips on how to get it to stay fresh for as long as possible.
It can be hard to find pre-made fresh garland, so I have come up with a pretty easy and foolproof way of making my own.

Types of Fresh Greenery Used to Make Christmas Garland
There are so many different types of evergreen trees out there to use to make a garland; however, some will work much better than others. Let’s review some of the best options to make fresh Christmas garland.
Pine
Pine tree branches are wonderful to use in your fresh garland as they are usually quite large, bushy, and long in size. They are a beautiful deep green color, add tons of texture, and nothing smells quite as good as fresh Pine! Pine trees make amazing Christmas trees as well.
One downfall with Pine is the amount of sap produced from the cut branch ends. This can cause a bit of a mess if used indoors, such as if it drips on your carpet or hardwood. Pine branches don’t drop needles or change much color as they dry, making them a perfect option for indoor greenery.
Spruce
Spruce branches are lovely for adding texture to any garland! A few variations of Spruce trees are very good to use in garlands, Blue Spruce, Black Spruce, and White Spruce. Depending on the type of tree you can find in your area, the color will vary from a beautiful blue tone to a lovely soft green!
Spruce branches can be quite wide and may need to be cut smaller or wrapped in your garland to prevent your garland from being too big! These trees will also drop needles as it dries so they can make a bit of a mess indoors.
Fir
Fir trees can be more challenging to find but are a very bushy and beautiful addition to any fresh evergreen garland! These branches will vary slightly in color depending on the type of Fir tree you can find.
Like so many evergreen species, Fir tree branches smell amazing in your garland!
Cedar
Probably my favorite fresh greenery for the holidays, Cedar branches are the perfect tree to use to make garlands. These branches usually come very long. They are easily workable and can be shaped or cut into any size you need for your garland.
Add Cedar branches to the base of your garland and then layer other types of evergreen on top. This will make for a very easy and effective way to make a garland. Cedar smells incredible and doesn’t drop any needles when it dries, which makes it an excellent option for indoor use. It does fade in color and curls on the ends as it dries, however, so that is something to consider when using it indoors.
Juniper
Juniper is a wonderful addition to any garland as it smells amazing and has a very unique texture and appearance. It can also be found with beautiful soft grey or blueberries for added decor appeal. Juniper smells amazing as well!
Juniper doesn’t change shape or drop any needles as it dries which makes it a great indoor option for garland. It does, however, change color slightly and will crumble when moved, which can make a bit of a mess.
Where to Find Greenery to Make Garland
For some of us, it is VERY easy to find and gather fresh greens to make your own garland! Simply walk into a forest nearby and clip a few branches. Most areas will allow you to take branches from trees however, if you are heading out to government land, you may require a permit to remove any tree species. Double-check what the requirements are in your local area.
If gathering your own greens is not an option for you, order your greenery through a local florist! You may need to do this as early as September to make sure you get enough of the types of greenery you want. Some local hardware stores now carry stock of fresh evergreens annually, but it is usually quite expensive. Ordering through a florist is usually a much better option!

Faux Greenery Options
You can use the same concept and technique to make Christmas garlands out of faux materials! The outcome will still be beautiful, but you will not have the lovely smell in your home that you get when you use fresh greens.
Shop Faux Greenery
Additional Garland Decorations
The wonderful part about making your own fresh garland is that you have the option to keep it simple or add additional decor elements to it. I love the minimal look, but you can certainly add more natural elements to the garland. A few great natural decor elements are:
- Pinecones
- Red Berries
- Eucalyptus Branches
- Burlap Ribbon
- Dried Orange Slices or Dehydrated Fruit
- Cinnamon Sticks
- Twinkle Lights

Prepping Greenery to Make Garland
When using fresh trees and greenery, it is a good idea to soak the greens before making your garland. Simply fill a tub or bucket full of water and submerge as many branches as possible. Leave the evergreen branches in the water for at least 4 to 12 hours. The longer, the better, as this will help your garland last longer.
It is also recommended that you snip the ends of your greenery before soaking them. This allows the branch to soak up as much water as possible prior to making the garland. Use a good set of tree nippers for this.
Storing your greenery somewhere cool or outdoors, if the temperature is cold enough, is also recommended. This will help your fresh greenery last much longer.
How To Make Garland Out Of Greenery
Equipment For Making Garland
- Burlap Twine
- Florist Wire
- Wire Cutters
- Garden Gloves
- Tree Nippers to cut the fresh greens.
- Water Picks filled with water, you can get these cheap from a local florist.
- Wilt Pruf, available at Canadian Tire
Materials Needed to Make Garland
- Various Fresh Evergreen Branches
- Additional Greenery of Your Choice
- Optional * Floral Water Tubes
Optional
- Pinecones
- Berries
- Dried Orange Slices or Dehydrated Fruit
- Burlap Ribbon
- Brass Bells
- Eucalyptus Branches
- Twinkle Lights
- Cinnamon Sticks
Directions For Making Garland
- Begin by cutting the ends of your evergreens and letting them soak for 4 to 24 hours in buckets of water or submerge them in a bathtub full of water.
You can use a product in the water, such as the sugar solution or Miracle-Gro, for Christmas Trees, just to give the garland a little bit more life.
- Before bringing the greenery into your house, spray thoroughly with the Wilt Pruf, this will provide a protective coating that will help the product hold water in and last longer.
- Cut your burlap twine to the length of the garland you want. Lay the twine out on a table or workbench.
- Collect a few stems of evergreen that are similar in length and place them along the twine.
- Wrap the florist wire three times around the base of the stems and twine tightly!
- Collect another bundle of greenery, then overlap the bunch about halfway down the secured bunch and wrap them tightly with wire. The top bundle must sit high enough on the bottom to secure a good portion of its stems.
Depending on where you decide to hang your garland, you will need to decide on the thickness.
- Continue to layer and attach your bundles until you reach the end of your twine.
- For the final bundle, turn it the other way around and tightly wrap the florist wire three times around it to secure the end. This will give you a nice finished look at the end of the garland.
Directions On How To Hang Garland
- Once you have finished wrapping the bundles, go back through the garland and add sprigs of evergreen or optional decor items to the garland. Pay attention to the areas showing exposed stems, wire, or twine, and try to cover those spaces with additional evergreen or decor elements.
- The next step is deciding where to hang or display your garland. Use a couple of large nails at the top of the trim so you don’t have to patch the holes, but the garland will be secured by the nail.

Preserving Fresh Garland
There are a few ways you can preserve your fresh garland. All of them require a bit of work but are well worth the effort if your garland continues to look good and smell amazing.
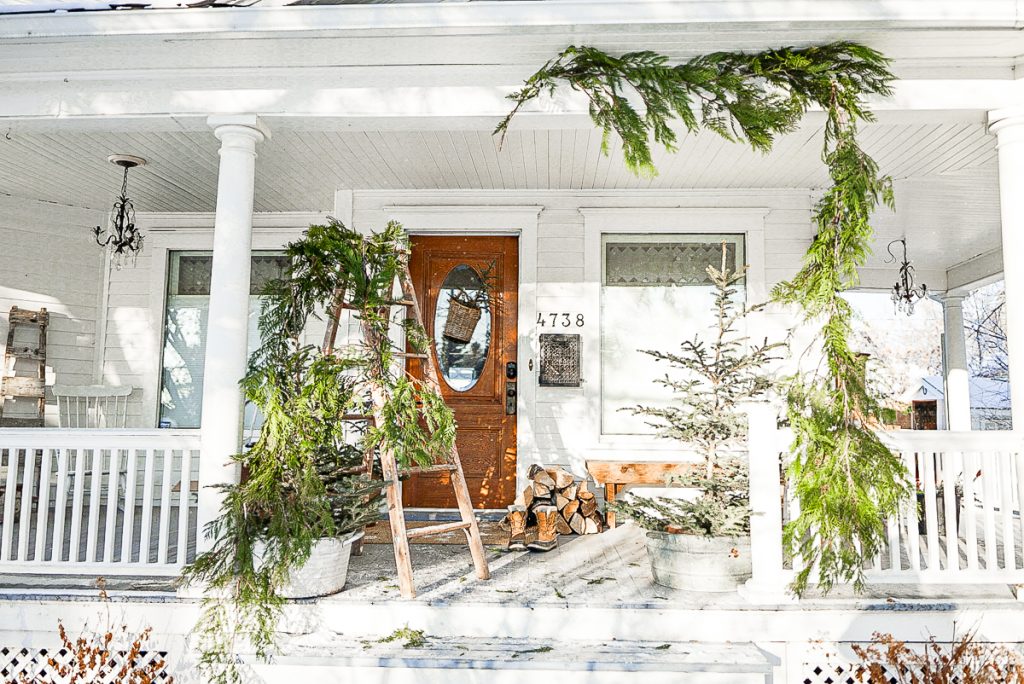
Hang Fresh Garland Outdoors
Hanging your fresh garland outside will make it last much longer! Or if you do choose to have it indoors, you can move it outside in the evening. Yes, this can be a bit of work, but it could make your fresh garland last weeks longer.
Add Floral Picks To The Fresh Christmas Garland
Adding water picks or floral water tubes on the end of the evergreen branches as much as possible. This will allow your fresh greens to last much longer.
Spray Garland With Water
It is a good idea to spray your fresh garland with water every day to prolong the length of freshness. Saturate the greens by using a spray bottle full of water at about the same time each day.
Tips On How to Make Garland
- Make sure you wear gloves at all times. The evergreen branches can be tough on the hands and cause you to get needle pricks. Your fingers will also end up covered in sap, depending on what type of evergreen you decide to use.
- Use a floral wire that is coated with green plastic. This is the least likely to show when adding extra decor to your fresh garland.
- Spray your garland with a spray bottle full of water daily around the same time to prolong the freshness.

More Holiday Inspiration
If you loved this easy DIY, try out one of the other natural Christmas decoration tutorials on the blog.
Frequently Asked Questions
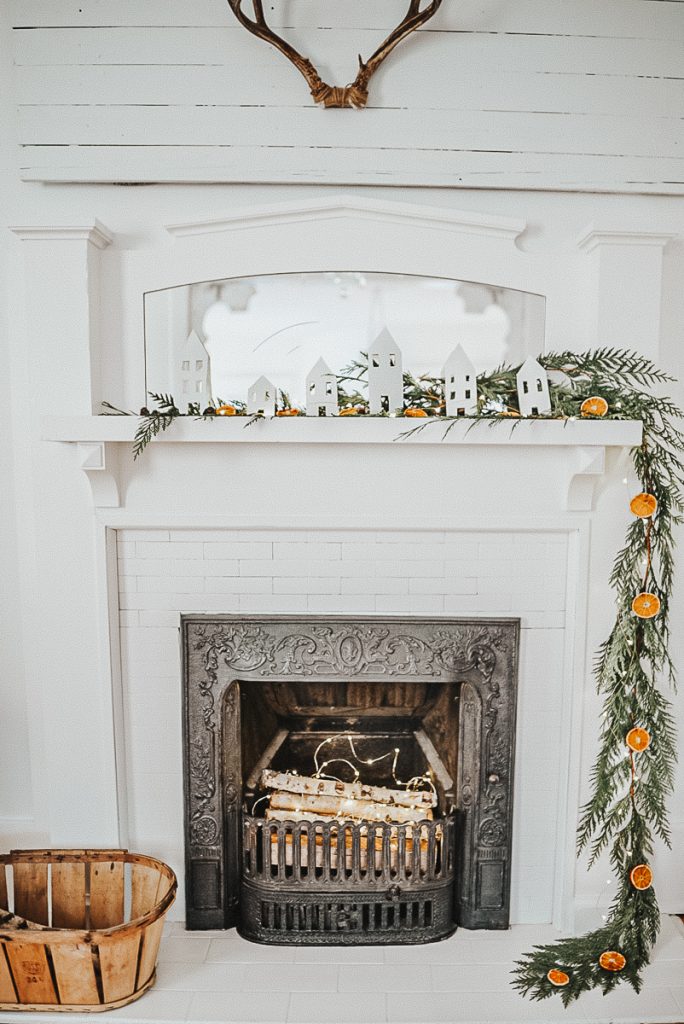
Fresh garland is perfect to use all holiday seasons. Simply add the fresh Christmas garland above a fireplace mantle, down a table as a runner, or even string it over an archway or door to give a beautiful entrance to any holiday space.
There are many different ways to hang garlands nowadays. Old-fashioned nails work well but can cause nasty holes to be filled. Adhesive hooks are a great way to hang garland, but you need to be sure the hooks are strong enough to hold the weight.
Tying your garland in place using ribbons, fishing lines, or twine can also work well.
I hope you found this DIY on how to make fresh garland useful, and that it answers all the questions you may have. Please let me know if you try this one by leaving me a comment below. For more easy ways to decorate for the winter season, make sure you check out these 25 winter decoration ideas.

want to save this recipe?
Enter your email & I’ll send it to your inbox. Plus, get great new recipes from me every week!
By submitting this form, you consent to receive emails from B Vintage Style.

How To Make Garland Using Fresh Greenery
Equipment
- 1 Burlap Twine
- 1 Florist Wire
- 1 Wire Cutters Used to cut the fresh greens
- 1 Garden Gloves
- 1 Tree Nippers
- 1 Wilt Pruf Available at Canadian Tire
Materials
- 5 bundles Various Fresh Evergreen Branches
- 5 bundles Additional Greenery of Your Choice
Optional Garland Decor
- 1 pack Pinecones
- 1 pack Berries
- 1 pack Dried Orange Slices or Dehydrated Fruit
- 1 pack Burlap Ribbon
- 1 pack Brass Bells
- 1 pack Eucalyptus Branches
- 1 pack Twinkle Lights
- 1 pack Cinnamon Sticks
Instructions
- Begin by cutting the ends of your evergreens and letting them soak for 4 to 24 hours in buckets of water or submerge them in a bathtub full of water.
- Before bringing the greenery into your house, spray thoroughly with the Wilt Pruf, this will provide a protective coating that will help the product hold water in and last longer.
- Cut your burlap twine to the length of the garland you are wanting. Lay the twine out on a table or workbench.
- Collect a few stems of evergreen that are similar in length and place them along the twine.
- Wrap the florist wire three times around the base of the stems and twine tightly!
- Collect another bundle of greenery, then overlap the bunch about half ways down the secured bunch and wrap them tightly with wire. The top bundle must sit high enough on the bottom to secure a good portion of its stems.
- Continue layer and attach your bundles until you reach the end of your twine.
- For the final bundle, turn it the other way around and tightly wrap the florist wire three times around it to secure the end. This will give you a nice finished look at the end of the garland.
- Once you have finished wrapping the bundles, go back through the garland and add sprigs of evergreen or optional decor items to the garland. Pay attention to the areas that are showing exposed stems, wire or twine and try to cover those spaces with additional evergreen or decor elements.
- The next step is deciding where you want to hang or display your garland. Use a couple of large nails at the top of the trim so you don’t have to patch the holes but the garland will be secured by the nail.
Notes
- When soaking your greens, you can use a product in the water, such as the sugar solution or Miracle-Gro for Christmas Trees. This is just to give the garland a little bit more life.
- Make sure you wear gloves at all times. The evergreen branches can be very hard on the hands and cause you to get needle pricks. Your fingers will also end up covered in sap depending on what type of evergreen you decide to use.
- Use a floral wire that is coated with green plastic. This is the least likely to show when you add any extra decor to your fresh garland.
- Spray your garland with a spray bottle full of water every day around the same time to prolong the freshness.


LOVE that garland girl! And your home is stunning.
I love that your spreading simple Christmas decor! Its way better than anything we can buy.. smells amazing also…Real Farmhouse Living !!
Thank you Shannon. I completely agree with you. So much better than anything we can buy.