This post may contain affiliate links. Please read our full Disclosure Policy.
If you’re looking to give your home a vintage or antique look, a brass chandelier can be a great addition to your decor. However, buying an antique brass chandelier can be expensive, and it may be difficult to find one that fits your style and budget. Fortunately, you can DIY an antique brass chandelier using spray paint and some simple techniques.
This project is easy and affordable, and it can give your chandelier a new life and a unique look. In this guide, we’ll walk you through the steps of DIY-ing an antique brass chandelier using spray paint and answer some frequently asked questions about the process.
If you have ever looked at images of my home then you know how much importance I put on lighting! Finding those perfect chandeliers for the spaces in your home is like the icing on the cake! Light fixtures truly do bring a whole room together! I have a number of DIY chandeliers in my home and I want to show you an easy and affordable way that you can give the chandeliers in your home an upgrade.
DIY Chandelier
original post and video by Brittany Dawn
DIY’ing (Do It Yourself) has come such a long way in the last few years…the projects that non-professionals are taking on is amazing and I’m here to share an easy DIY chandelier project using Rustoleum spray paint that will allow you to transform any light fixture in your home!
In this project, I took a dated crystal chandelier and made it look like an antique brass chandelier for the patio using Rustoleum Metallic Gold spray paint! It truly is amazing what a coat of paint can do, isn’t it?! Make sure to also take a look at this old antique wood stove that I made into an outdoor fireplace with a coat of paint!
Shop Types of Chandeliers

Updating a Chandelier
As an interior designer, I see so many clients restrict how they shop for lighting fixtures based solely on the colour of the metal on the chandelier. Sometimes you find the perfect fixture that is the perfect shape and size but it only comes in 1 colour! Let me show you how easy it is to DIY a chandelier so that it becomes that perfect fixture!
Don’t let yourself be limited to what a light fixture looks like in the picture… let yourself think outside the box! Can it be altered to make it your ideal light fixture?
How To Create A DIY Antique Brass Chandelier
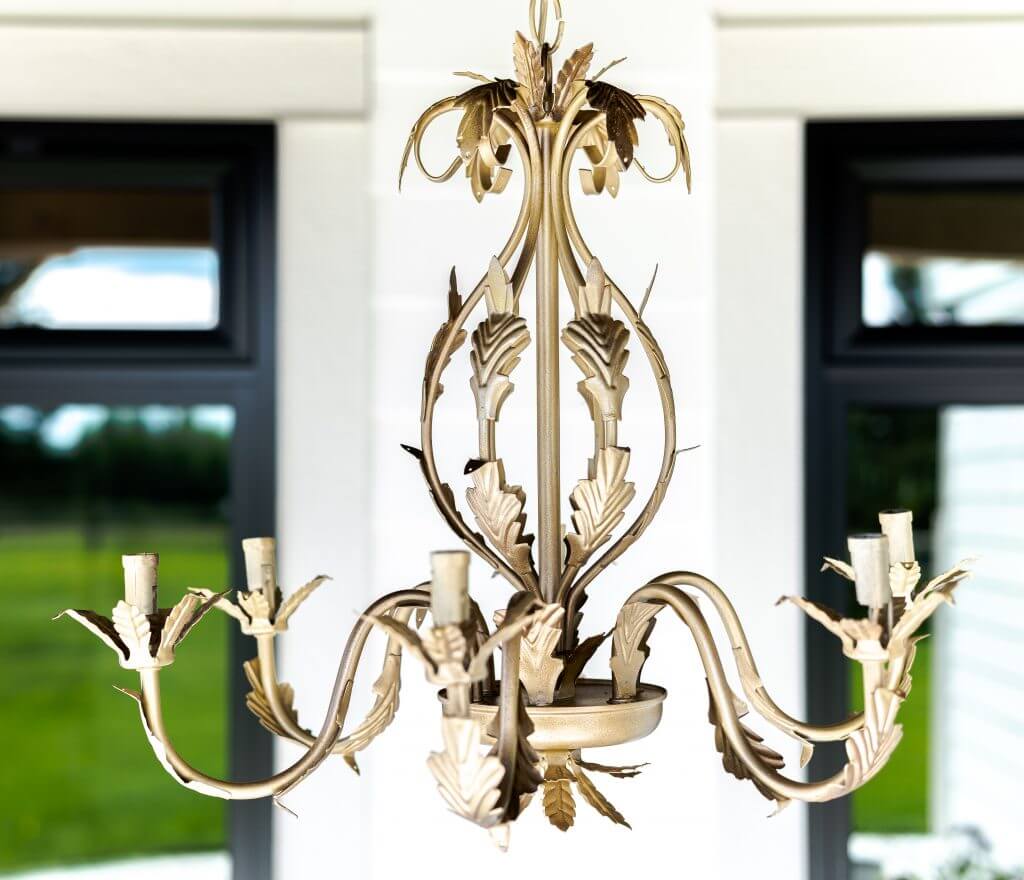
For this outdoor light fixture, I wanted to transform a white traditional crystal chandelier to have a weathered antique brass appearance but I knew I couldn’t achieve that effect with 1 colour. This DIY technique will give any fixture an antique brass appearance and an old-world feel.
Check out the full DIY Chandelier Tutorial Video below and then read below for the full STEP by STEP instructions!
PREP TIME – 30 minutes
PAINT TIME – 45 minutes
DRY TIME – 1 hour
REASSEMBLE & CLEAN UP TIME – 45 minutes
TOTAL TIME – 2.5 hours

Tools & Materials
- Any light fixture! NEW or OLD!
- 1 can RUST-OLEUM Universal Metallic Antique Brass
- 1 can RUST-OLEUM Universal Metallic Pure Gold
- Painters Tape
- Drop Cloth
- Mask
- Ladder if the chandelier is suspended
- The willingness to try something new!

Instructions for Making an Antique Brass Chandelier

- Prep the chandelier by removing all the light bulbs, lighting sleeves (if desired) and giving it a good wipe down. If the fixture is new, you can leave these components off
- If you are leaving the chandelier hanging like I chose to do, you will want to tape off your ceiling above the fixture.
- Place a drop cloth under light fixture.
- Begin spraying with the Rustoleum Metallic Gold spray paint. This doesn’t need to be perfect, just apply a good coat to the fixture.
- Do NOT wait for the gold spray paint to dry but rather quickly start applying the RUST-OLEUM Universal Metallic Antique Brass in patches. With the Antique Brass spray paint, you are not covering the whole fixture but rather only applying in areas where the “sun” would have caused the gold to discolour and darken. Applying the 2nd colour while the first colour is still wet allowed them to blend together to create a more authentic antique appearance.
The beautiful part of DIYing with RUSTOLEUM Universal Metallic Spray Paint is that you can easily fix your mistakes!

- Observe any spots you may have missed and go back over with RUST-OLEUM Universal Metallic Pure Gold. Then again adding touches of RUST-OLEUM Universal Metallic Antique Brass! Have an overall look at your chandelier and see if you like the ratio of the Pure Gold Colour to the Antique Brass colour.
- Remember, when you are DIY’ing, it is personal preference and you can tweak things to your exact taste! In the end, I went back over mine and applied more Pure Gold where it was to dark and applied more Antique Brass in areas I wanted to look more vintage!
- Then re-attach any crystals or beads. I wanted this DIY chandelier to have a more minimalistic feel so I actually left a lot of the crystal off.
- For an extra touch, I purchased flame tip light bulbs to give the DIY chandelier a more vintage feel!

The RUST-OLEUM Universal Metallic Paint & Primer in One covered so well and I actually used less paint than I thought I would. This was such an easy project and I love that there is lots of room for error and creativity!

RUSToleum Universal Spray Paints
Some of the best parts of the RUSToleum Universal Spray Paints are:
- Offers one coating for a diverse range of surfaces, including metal, wicker, concrete, wood, vinyl, laminate plastic, glass and more!
- Interior and exterior rust-preventative formula
- Comes in 5 different finishes: Clear, Enamel Paint & Primer, Hammered, Metallic & Pearl Metallic
I can honestly say that this spray paint product has improved since the last time I used it. I hope this project inspires you to give one of your chandeliers a little upgrade with this simple DIY project!

Tips for Making a DIY Chandelier
If your taking on an outdoor light fixture, I recommend a metal chandelier with no plastic parts! You will also find that some chandeliers have plastic crystals but glass or crystal tend to hold up better in the outside elements. I should note that my chandeliers are NOT outdoor rated because they are under a covered patio. Please consult an electrician to see if your outdoor living space would require special ratings for the weather elements.
If at all possible, hang your chandelier when you are painting it! It is much easier to paint the entire chandelier while it is hanging rather than having to rotate it on the ground.
Check out some before & afters of this DIY Chandelier project!


Frequently Asked
It’s best to use a spray paint that is specifically designed for metal surfaces, such as a metallic or hammered finish spray paint.
It’s recommended to remove the chandelier from the ceiling before painting it to ensure even coverage and to prevent any paint from dripping onto your floor or furniture.
Clean the chandelier thoroughly with soap and water, and then dry it completely. Sand the surface lightly with fine-grit sandpaper to create a rough surface for the paint to adhere to. Cover any parts of the chandelier that you don’t want to paint with painter’s tape.
It’s recommended to apply at least two coats of spray paint to ensure even coverage. Allow each coat to dry completely before applying the next coat.
Once the chandelier is completely dry, you can reattach it to the ceiling using the hardware and wiring that came with the chandelier.
Yes, you can use this technique on any metal surface, such as light fixtures, lamps, or picture frames.
More DIY Projects
- DIY Ladder And Edison Bulb Chandelier
- Easiest Ways To Age Metal
- How to Make a DIY Ceiling Mounted Clothes Drying Rack
Looking for more DIY painted project inspiration, check out the chandelier from my Home Office or my friend Wendy Kennedy’s Vintage Stereo Upcycle Project!
want to save this recipe?
Enter your email & I’ll send it to your inbox. Plus, get great new recipes from me every week!
By submitting this form, you consent to receive emails from B Vintage Style.

DIY Antique Brass Chandelier
Equipment
- Painters Tape
- Drop Cloth
- Mask
- Ladder if the chandelier is suspended
Materials
- Any light fixture! NEW or OLD!
- 1 can RUST-OLEUM Universal Metallic Antique Brass
- 1 can RUST-OLEUM Universal Metallic Pure Gold
Instructions
- Prep the chandelier by removing all the light bulbs, lighting sleeves (if desired) and giving it a good wipe down. If the fixture is new, you can leave these components off
- If you are leaving the chandelier hanging like I chose to do, you will want to tape off your ceiling above the fixture.
- Place a drop cloth under light fixture.
- Begin spraying with the Rustoleum Metallic Gold spray paint. This doesn't need to be perfect, just apply a good coat to the fixture.
- Do NOT wait for the gold spray paint to dry but rather quickly start applying the RUST-OLEUM Universal Metallic Antique Brass in patches. With the Antique Brass spray paint, you are not covering the whole fixture but rather only applying in areas where the “sun” would have caused the gold to discolour and darken. Applying the 2nd colour while the first colour is still wet allowed them to blend together to create a more authentic antique appearance.
- Observe any spots you may have missed and go back over with RUST-OLEUM Universal Metallic Pure Gold. Then again adding touches of RUST-OLEUM Universal Metallic Antique Brass! Have an overall look at your chandelier and see if you like the ratio of the Pure Gold Colour to the Antique Brass colour.
- Remember, when you are DIY’ing, it is personal preference and you can tweak things to your exact taste! I went back over mine and applied more Pure Gold where it was to dark and applied more Antique Brass in areas I wanted to look more vintage!
- Now re-attach any crystals or beads. I wanted this DIY chandelier to have a more minimalistic feel so I actually left a lot of the crystal off.
- For an extra touch, I purchased flame tip light bulbs to give the DIY chandelier a more vintage feel!
Video
Notes
Pin for later